Wednesday, February 20, 2013

Flexible Webcam Arm

So I saw a MakerBot webcam attachment http://www.thingiverse.com/thing:8269 which inspired me to make something similar that would work with my webcam. This will allow me to take pictures, video, and time lapse of stuff I print.

http://www.thingiverse.com/thing:52533 is mine. I dont know if anyone will actually ever print it, but the link segments might be useful for something.


The mounting clip is in the foreground. 6 legs, and then the bracket that fits the camera. 


Im mad this photo is turned. Blogger keeps turning it on me. Just tip your head and you will see the chain attached to the acrylic plate on top of my printer. I tried to arc the links nice and evenly so it would look better. It is assembled using M3x16 bolts, washers, and nuts. I tightened them down pretty tight (not to tight so it wouldnt break the plastic)

Probably time lapse videos of future prints on the way!


Monday, February 18, 2013

New tape, and starting print code

I know it's been a while since I have done anything with the printer. This one mainly because of the last crash I had where it ripped up all the tape. I was having a hard time getting motivated to fix the bed. I finally got around to it since I am on a 3-day weekend! I took a lot of time placing the new tape to  not be wrinkled or bubbled. No gaps between strips either (within reason). 

My print area is framed by the blue corner marks. The pencil rectangle is on the ceramic and couldn't get it off. It is not as wide as I would like because at the max height my cooling with crash into the frame. 

The next big thing I did I cant really show a picture of. It is a programming thing. In KISSlicer and other slicing programs it is common practice to put some start code and end code to add to every print. Such as home all axis, reset extruder, etc. Here is what I did and why;
G-code Prefix
G28 ; home all axes
G1 X0 Y0 Z10 ; move to z10
G92 E0 ; reset extruder
G-Code Postfix
M104 S0 ; turn off temperature
G28 X0  ; home X axis
G28 Y0  ; home y axis
M84     ; disable motors

The Key line is the underlined one. What this does is bring the z level up to 10 before it starts to print. It will then move on a very nice linear diagonal until it hits the point where the print is going to start (in my case usually (100,100,0). The reason I did this was because it allows it to clear the tape in-case there is a wrinkle or bubble and not rip the tape up. Also if a little piece of plastic is hanging off the nozzle it might catch the tape edges too. If you look in my previous posts you will see where the tip dragged and ripped the bed the shreds. Now if it is going to drag it will only do it at the start point of print instead of the path to get there. This happened more than a few times in the past because I like the first layer so thin for ultimate adhesion. 

Sunday, February 17, 2013

Mountain Top Pt4

So I know it has been a while. But trust me I have spent a lot of time getting to this point. This took a lot of time and I worked on it in small batches. I didn't want to update the photos until the mountain top was complete (without trees and some additional accents like hikers or animals).

Here you can see where I have added the basic ground foam over the painted base from pt3. 

Next I began adding in some bushes and smaller rocks

Lots of rocks and bushes added to bring it to life

Close up of the front rock. Little shiny due to flash glare. Will need to rub some brown chalk on it to dull it for future pictures. Remember this front rock is only 1" tall and the ones on the next level in background are 2" tall

If you were to climb my mountain and look down from the top this is the view you would have. 

With a sky backdrop looking up the 5 inch mountain. I have yet to put some trees on it, but you get the idea. 


Here is the overview of it. I will need to blend this into the next section of the layout and then add my accents. Hope you enjoy it!


Saturday, January 5, 2013

Bears?!

So I tried printing thingiverses Brown Bear and the results were very pleasing! I set the scale for 40% of the original size to save on plastic. It also only has 10% fill. I wanted to play with the slidder bar in Kisslicer that allows you to print faster or slower.

The bear on the right was printed at 80% precision. This just means that if you take the difference between my max set speeds and make it a scale of 0-100 it was printed at 20 (slow). The print on the left was printed at 100% precision, make it the slowest setting I have set. On the bear on the right you can see very clearly where each layer starts. This is because I had a setting turned on the extrudes .2mm of material after each move and 0mm of retraction. Because of this there was just a little bit of extra material at the start of each layer. 

After I changed that value the 0 the seams cleaned up super well on the slow bear. But for some reason, just above the slow bears elbow, 1 layer is a little wider than the rest. At first I thought the print shifted, but nope its a little ledge the whole way around. Must just be the way it was sliced. 

So a post or so ago I mentioned that I crashed the print head and had to relevel. Well the bed is level but my z height clearly needs to be adjusted. I am having problems with tip drag, even with a z-offset setting. I need to just tweak my homing sensor up a tiny bit. 

Monday, December 31, 2012

Bringing in the new year with a kiss

So I made an upgrade yesterday to Kisslicer to see how it would do. First thing off it was extruding any material. I finally found the setting to make it work. Shorty after I crashed the head into the table. Well this required a whole bunch of calibration to fix.  I kept printing my little calibration cubes like normal until I was "satisfied". Nothing better than a kiss on New Years right?

Well next I decided to print something New Years themed. Thing 36257 was just what I needed. I decided to print 3 and make little tweaks between each of them. They all came out pretty good but still had some work to do. Enjoy your New Years and be safe!


This is a timelapse of the 2013 item being printed
One of them

Picture of all 3


Friday, November 30, 2012

Mountain Top Pt 3

I wasn't completely satisfied with the mountain landscape. Yeah I know it still needs ground foam and trees and details, but it was missing something. The wife had to make a trip to AC Moore for some supplies, so I tagged along. I found a much bigger selection in the scene-a-rama section. 

I picked up some thin sheets of plywood (1/32 and 1/164), to build structures out of later. I also picked up some little containers for when I mix my paints. I wanted something with a lid so I could shake it. Also got a carton of casting plaster, since I know I will need the rockmolds again elsewhere on the layout. They had a Ripplin' Water Kit I figured I would try out at some point. And finally another rock mold.

 This came with smaller rocks, 10 on the same size tray instead of 3. It was just a basic kit including only the molds and plaster. 

Those are some nice rocks you got there

Test fit

Spackled and glued in place 

Remember this is what it looked like

Landscape of mountain top: Complete! Now I just need to start adding ground foam, tullus, trees, etc. Look for my next update, hopefully soon!


Tuesday, November 20, 2012

Mountain Top Pt2

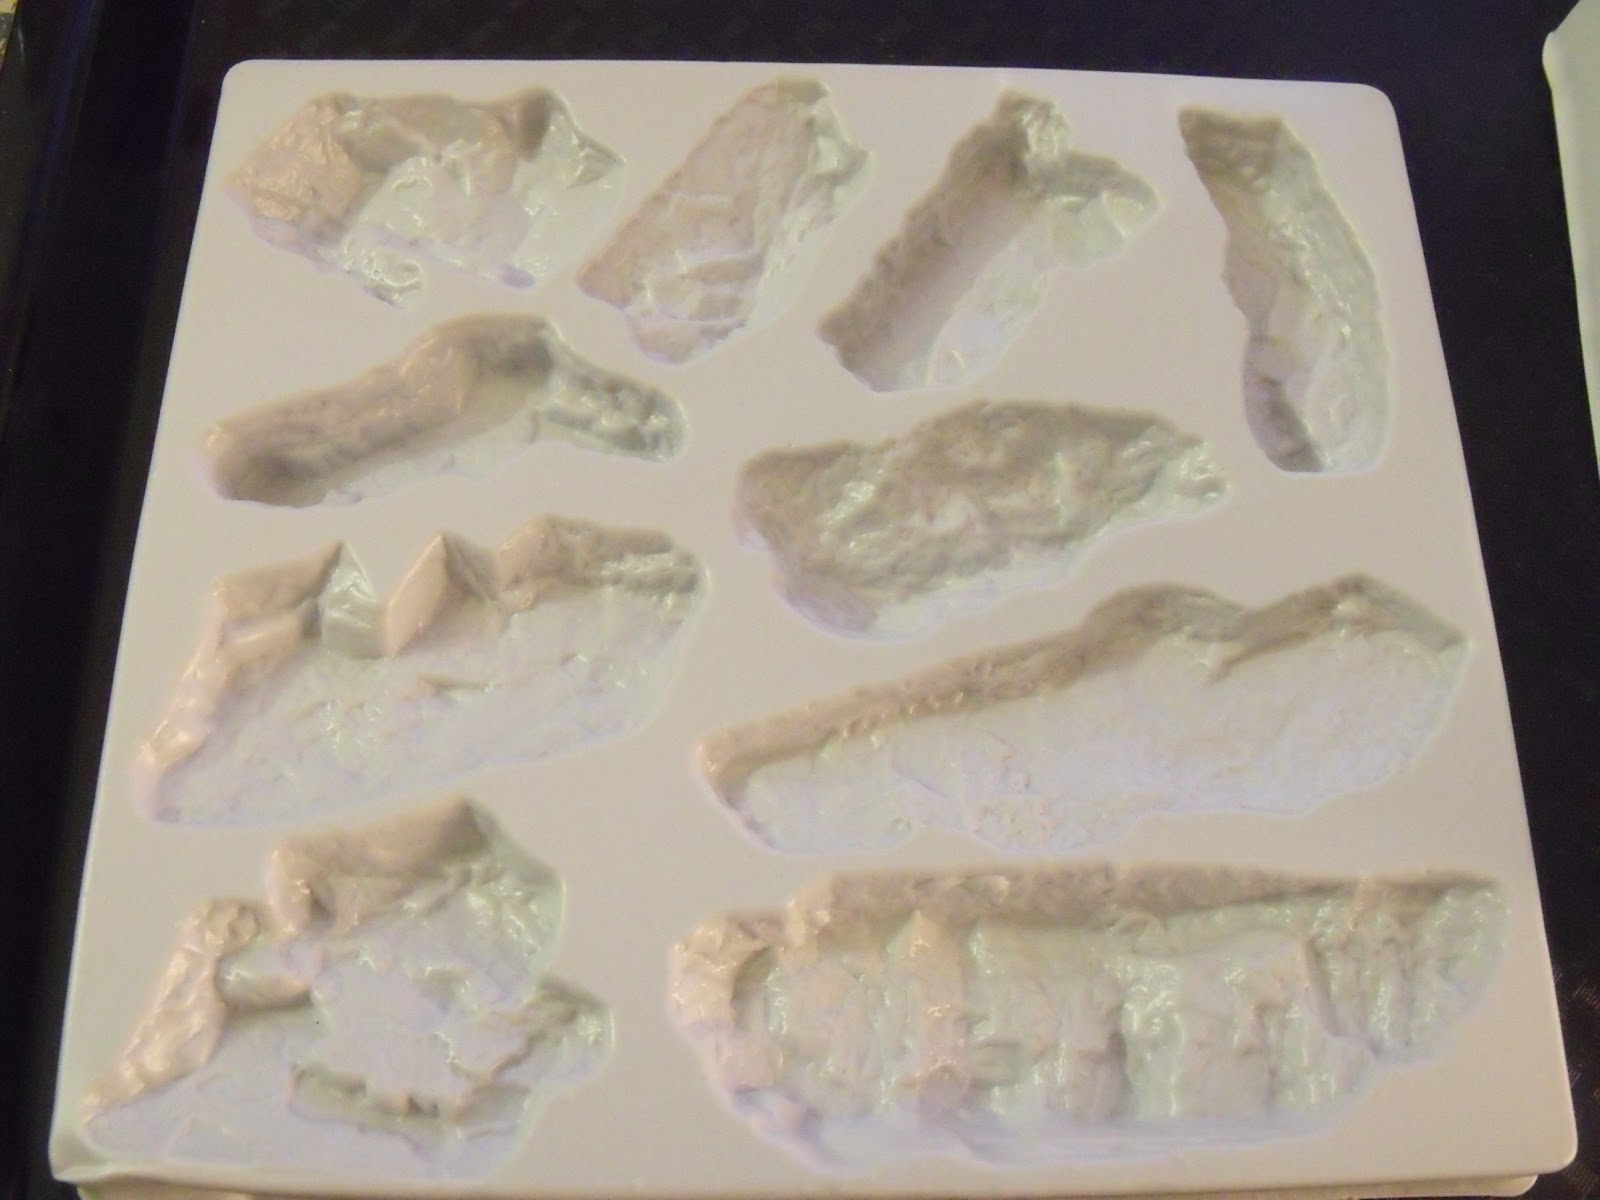
So now that the mountain was covered, it was time to make some rocks! The rock mold only made 3 rocks, each were pretty big (since I'm in Z-scale) but more to come on rocks in Pt3 ;)

Test fit of the 3 rocks from the mold

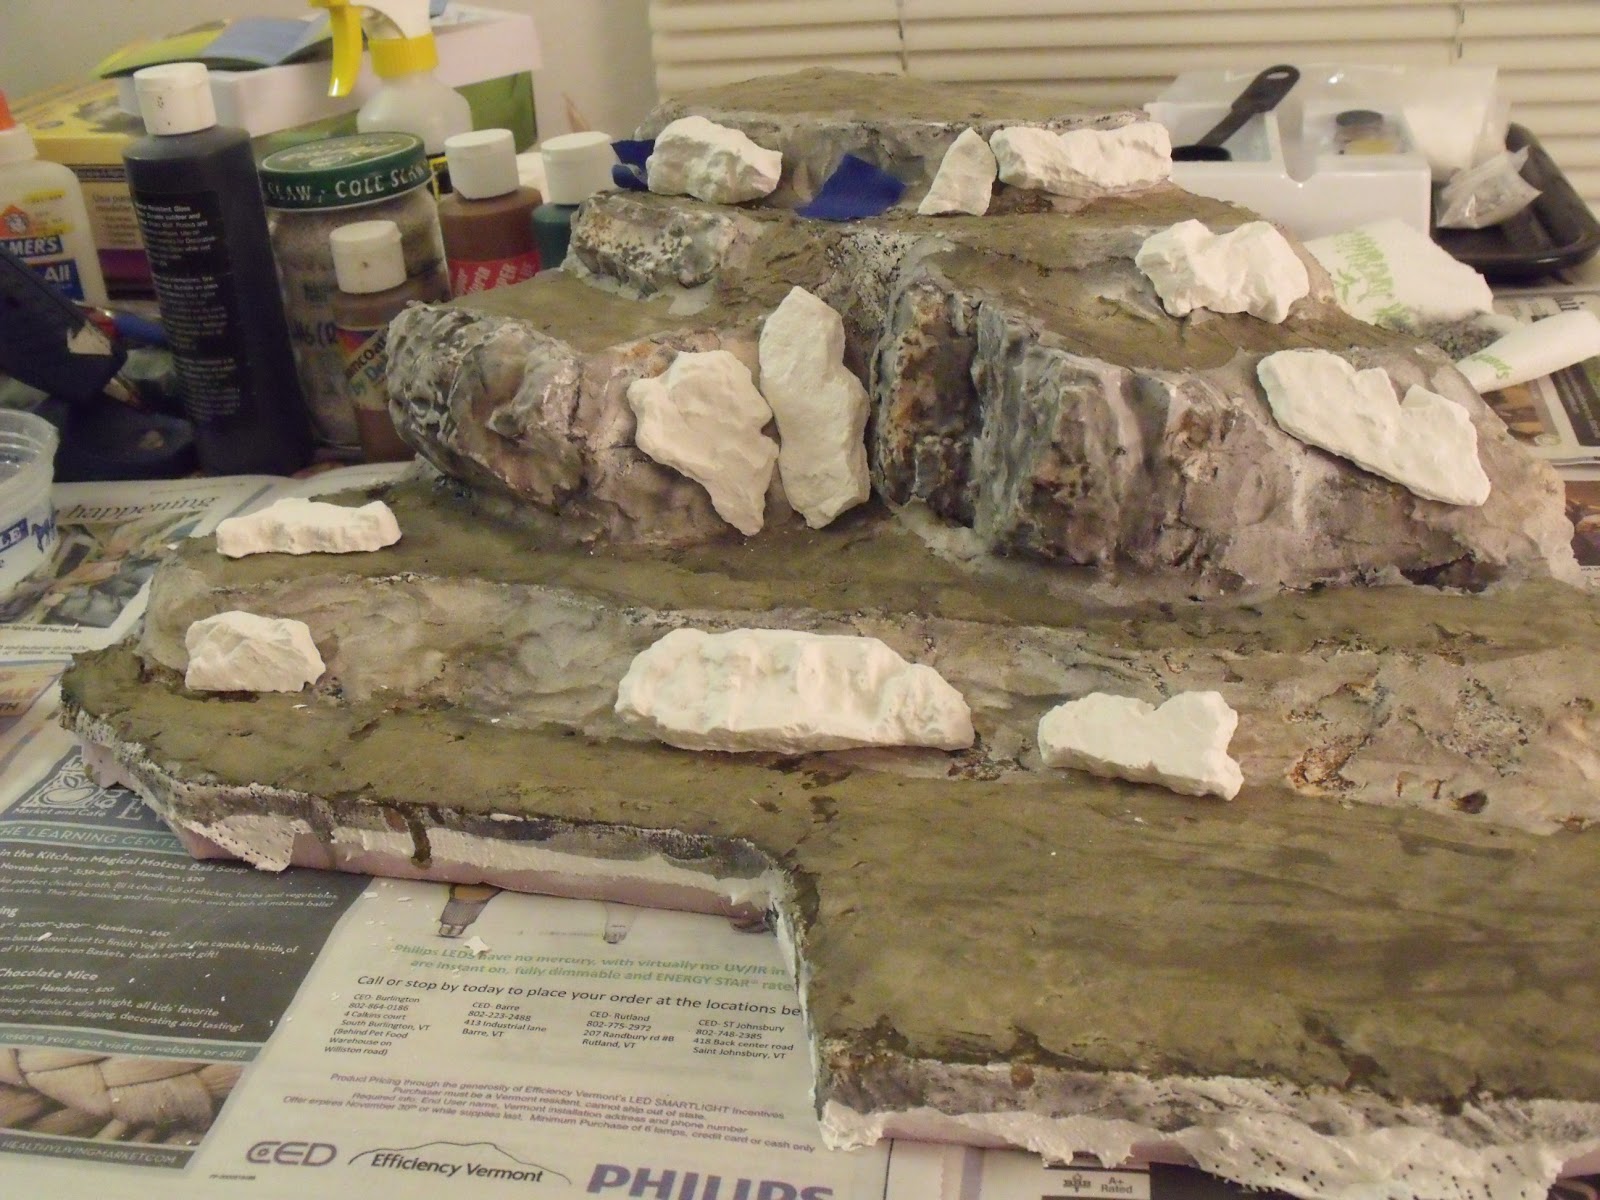
I glued the rocks on, then sealed the gaps using a lightweight wall spackling. I love using this stuff on my layouts. If you use it and find it hard to spread out, just use a mister bottle and wet it down. It will take longer to dry but when it does it will be much smoother. 

A close up of a rock

So now it came time to color the rocks. The kit came with it's own paint but I decided not to use it. It was in limited quantity and I didn't want to run out and not be able to match it later. So I used some acrylic paints I had on hand.

I mixed up a light brown, a dark brown, and a very watered down black. You notice I mixed in bottle caps, this was because it was all I had available, and it allowed me to control how many droplets to water ratio. 

The rocks get speckled in the different shades of brown (1/3 area light 1/3 area dark), then the whole surface covered in watered down black.  

remember this is what it looked like before paint

Next I had to cover the flat areas with a concentrated dark brown mixture. This is to resemble dirt. This will later be covered in ground foam, but any area that is thin or shins through will show the dark brown. Looks pretty good eh? (white spot on-top of the right rock is the sun BTW, it is actually the same color as the face)

Part 3 will take the mountain to the next level of detailing. 


Sunday, November 18, 2012

Mountain Top Pt1

While the wife and I were shopping in the craft store so she could pick up some scrap booking things. This caught my eye.

 I have never purchased a scenery kit before (except buildings) on my other layouts. I knew I had a mountain top to decorate, so I figured I would see how this kit recommended to do it. I knew woodland scenics does tons of model railroading supplies, so why not trust there diorama sets? I knew that the trees are not going to be to scale for my use, but at least I got some rock molds and some good directions.

Around 2 weeks ago I decided to open the kit and see what becomes of it. The Kit contents: Plaster cloth, glue, spray bottle, rock paints, earth undercoat paint, shaker, different turf media colors and grades, tullus, casting plaster, rock mold, and an instruction booklet.

I modified the foam slightly to have a nice steep face since the rock molds are pretty big. (The big rock about 36 scale feet tall by 70 scale ft wide)

 After wadding up some strips of news paper to help decrease the intensity of some of the steps, I got to work with the plaster cloth. 

I made sure to cover up the back side too. This was to help complete a shell so that it wont be able to peel up on the edges and come disconnected. 

Nice complete coverage!

Saturday, November 17, 2012

Let the Land Take Shape

Next I used my pink insulation to start replacing the paper cards that I had folded up before.

Start with some basic shapes

Next fill in some thick sheets and mark out where to remove material

Using a rasp I cleared away the material

When I decided to put in that upper loop in the corner, I knew it would be in a mountain

Sooooo... Heres the basic shape of the mountain. The tunnel port you see is scratch built, and will be one of my next posts! Stay tuned.

Elevation Trials

After deciding on a track layout, you need to decide what elevation changes are needed. So this past winter I did out some simple sketches and shading to show the different levels. 


Here are the sketches I did.

Time to start laying track!

Track laid down

Added a raised loop I never planned on

I used paper folded up to do a mock up of the elevation changes

Now time for the land to take shape :)

Wednesday, November 14, 2012

Prelim Layout

Back in my second year of college (2008ish) I planned out a layout for a 2' by 4' space. I took the Marklin books, a piece of graph paper, and my tube TV and got to work designing a layout. I taped the Marklin book to the TV on a page that showed the different track and their part numbers. I then turned the TV to an all white channel so that the light would shine through. Moving the graph paper over this I meticulously drew out the track plan


This picture shows the paper that I taped to the TV

Here are my graph paper drawings. This is the outer main loops, which I later added a small siding at the bottom. (notice the curve turn outs on the left as well)

This is an inner loop that I planned to fill it in

After I finished this, I made a list of all the track pcs I would need. I then spent the next few months slowly collecting the pcs I needed on E-bay auctions. The reason I did this was because Marklin track brand new is very very expensive (I didnt want to spend $50 per curved turnout, or $5 for each pc of straight, etc.) There is still multiple hundreds of dollars worth of track that I managed to get at about 60% of full price. 


Sunday, November 11, 2012

The Trains Intro

This is the second edition to my blogging. I originally built the 3d printer with my model railroad in mind. Well its been 8 months and I haven't but any attention towards my trains. I am years behind on posts, so I maybe updating random things from the past about my layout. Well with out wasting anymore time lets get started!

So as my profile says, I am into a few different scales of model railroading. I have always enjoyed trains, there are tons of people in the world who share this fascination. Maybe I enjoyed it since I grew up around train layouts and trains around the grandparents Christmas trees.

Originally I started off with N-scale. HO scale is very common but takes up a large space. I wanted to do N since it would be easy to have a larger layout, and the cost is easy to deal with. While I never fully settled on an N-scale layout before going to college I still have a large assortment of track, locomotives, models, and railstock. Near the end of high school I decided to start experimenting with Z-scale. It took up such a tiny space and was going to be easy to transport and work on while in college. Back when I started you would be lucky if there were 2 pages worth of stuff on E-bay, now there are thousands of items for sale on there.

I made 2 briefcase layouts in Z, one while in high-school, and one in college. Those pictures will be posted eventually. My main goal has been a Z-scale coffee table. That is what my railroading posts will be centering around for now.


I should also note that I have a layout in 1:900th scale ("track" width of about 1.6mm) But that is a post for a different time :)

No worries the 3d printing stuff will continue! Just now hopefully for the use I intended it for

Sunday, October 7, 2012

First Print With Blue

Well now that I finally got the print bed level, and the new filament in I was able to print. On my first attempt to print something I had a little issue. The filament got to fat at one point and jammed the print head. The filament holds steady at 3.07-3.09mm but one little section got up to 3.67mm! To those of you who know about 3d printing reading this, you know that is a big issue. Well I had to heat the hot end up to 240 Celsius and pull it out with pliers with all my might. I couldn't believe how bad it was jammed in there. I then had to do some minor adjustments since I lifted up on the z-axis while doing this.

Anyhow, once I got it running again here is a little owl I printed while writing my previous post. The orange is from a few weeks ago but the blue is with the new filament, just scaled down a little.